Our needs: Users must have the possibility to be part of multiple departments. We should be able to use the values of the department attribute as part of the displayName, description, etc. in FIM and AD. So our users must be able to select multiple departments and as an extra requirement, we wanted to show the department names according to the language setting of the browser.
Problems: While only thinking of the business logic, we thought ‘no problem’ and we started with implementing department as a multi-value attribute. No problems there. We could easily extract the values in our MA extensions to use them to create other values like ‘displayName’ or to put them in the description of a user ( “department1 – department2 - …”) . But then we started with creating the UI…
We didn’t like the UOCCommonMultivalueControl because we did not want the user to be able to enter free text. So our first choice was a multi-select dropdown. But after some research, it appeared that the UOCdropdown component only works with single valued attributes and that there isn’t a way to customize the build-in components like with Sharepoint - or .NET components.
As we thought to have found the perfect solution to our problem, we made a custom resource of ‘Department’. This custom resource would then be referenced by a person object, just like it is possible to reference someones manager. The UOCidentityPicker and the UOCListView offered the best user experience to choose between the large list of departments. Life was good ... until we hit another limitation: in FIM it isn’t possible to set a reference attribute in code. Dereferencing is possible in a custom workflow, but setting the reference attribute through code isn’t allowed. You can only do it from within the FIM Portal. So we were stuck…
But let us show how we eventually solved this problem.
Solution: it turned out that the users would be part of two departments at the most. So we created two department attributes each having their dropdown component. The only problem we now had left was the localization of the dropdown component. Like many of you would suggest, we tried to localize our dropdowns like Microsoft did with the ‘EmployeeType’ field. We created several constant specifiers and bound them to our department fields. But when you look at the example of the ‘EmployeeType’ field of Microsoft, you notice that they also specify the values in the regex or validation of the attribute itself. For ‘EmployeeType’ for example the regex was “^(Intern,Full-time Employee,Contractor)?$”. But while creating the regex for our department-dropdown ( “^(dep1,dep2,dep3,…)?$” ) we noticed the regex attribute can only obtain a max value of 256 characters. There had to be another way ...
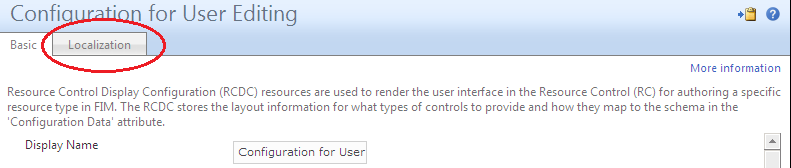
When editing the Resource Control Display Configuration (RCDC) of the user object, you have a tab “Localization” at your disposal.
The key is that through this tab, it is possible to export/import an .xml file for each language. The exported .xml files are holding sets of “SymbolResourcePairs”. This is for example the way that FIM handles the translation of the grouping-captions in the different views.
Now, let’s take an example dropdown where the user can select her preferred language:
Step 1: Go to the RCDC for User Editing > Localization tab, and export the SymbolResourcePairs-xml file for each language.
Step 2: Adjust the xml files you just exported by adding new symbols to support the translation of a language dropdown.
For example:
- English
- French
Step 3: Now you can use the symbols you just created in the RCDC of User Editing.
In the xml file you can create a XmlDataSource based on these symbols. The value of the “Code“ tag will be the value that FIM saves in the attribute. The name tag references the symbols you created to show the caption in the right language.
</Languages>
</my:XmlDataSource>
As you can see, the xml references the symbols by adding “%SYMBOL_” and “_END%” to the name of the item.
Step 4: Now we can use the XmlDataSource in a UOCDropdown control.

The “ItemSource” property binds the control with the XmlDataSource we created. Properties “ValuePath” and “CaptionPath” references the right XML tags by using values “@Code” and “@Name”.
Step 5: Import all the adjusted .xml files. After you perform an IISRESET, change the default language value of your browser, and hit the refresh button. Now you will see a localized dropdown!
While implementing FIM, I learn a lot of these small, but handy features in FIM. I'll keep you posted whenever I find someting new.